This appears to be caused by a corrupted Registry key on the user's PC, I was able to recreate the issue on a Windows 7 machine by deleting the below key. It should be fixable by importing that key from another PC. A Registry backup should obviously be taken before making any changes.
Location: HKEY_LOCAL_MACHINE\Software\Microsoft\MSLicensing\HardwareID
Key: ClientHWID
Type: REG_BINARY
Wednesday, 1 November 2017
Tuesday, 5 September 2017
Setting default Start [home] pages in IE
So you want to push your users towards that shiny new web portal. Using a GPO seems the obvious route.
Here's how.
Use a GPO to update a Registry key in the following location.
HKCU\Software\Microsoft\Internet Explorer\Main
Here are the key details for the first tab/single tab.
Action : Update
Hive : HKEY_CURRENT_USER
Key Path: Software\Microsoft\Internet Explorer\Main
Value name (default unticked) : Start Page
Value type : REG_SZ
Value data : http://www.google.co.uk
If you want to add a second tab...
Action : Update
Hive : HKEY_CURRENT_USER
Key Path: Software\Microsoft\Internet Explorer\Main
Value name (default unticked) : Secondary Start Pages
Value type : REG_MULTI_SZ
Value data : http://www.theregister.co.uk
You can set the policy to apply once and not reapply if needed as usual with a Group Policy Object.
Wednesday, 30 August 2017
RemoteApp on Windows 7 client prompts for credentials second time and says Login Failed
Sometimes people have older PC's that you have to support. I know right, FFS...
A perfectly functional RDS RemoteApp deployment (in Win 8 - 10) will give you a Login Failed password prompt when launching an app from the web portal.
Your primary suspect should be HTTP Redirection in IIS. Turn it off!

To bump people from the default HTTP site to RDWeb use the following html file customised with your domain.
<html>
<head>
<title>RDWeb redirect</title>
<META http-equiv="refresh" content="0;URL=https://remote.EXAMPLE.co.uk/RDWeb/">
</head>
<body bgcolor="#ffffff">
<center>Forwarding you to https://remote.EXAMPLE.co.uk/RDWeb/ <a href="https://remote.EXAMPLE.co.uk/RDWeb/"> https://remote.EXAMPLE.co.uk/RDWeb/</a>
</center>
</body>
</html>
Thursday, 24 August 2017
DNS name resolves wrongly on Windows
I had an issue where a DNS record was updated but a Windows PC would not see the change, even adding an entry in the hosts file was ignored.
Running the following in an elevated command prompt fixed the issue.
netsh int ip reset resetlog.txt
Running the following in an elevated command prompt fixed the issue.
netsh int ip reset resetlog.txt
Tuesday, 25 July 2017
Change published FQDN for Server 2012 or 2012 R2 RDS Deployment
Change published FQDN for Server 2012 or 2012 R2 RDS Deployment.
https://gallery.technet.microsoft.com/Change-published-FQDN-for-2a029b80
https://gallery.technet.microsoft.com/Change-published-FQDN-for-2a029b80
Add a full remote desktop to a RemoteApp Session Collection
Go to...
HKLM\SOFTWARE\Microsoft\Windows NT\CurrentVersion\Terminal Server\CentralPublishedResources\PublishedFarms\<collection>\RemoteDesktops\<collection>
HKLM\SOFTWARE\Microsoft\Windows NT\CurrentVersion\Terminal Server\CentralPublishedResources\PublishedFarms\<collection>\RemoteDesktops\<collection>
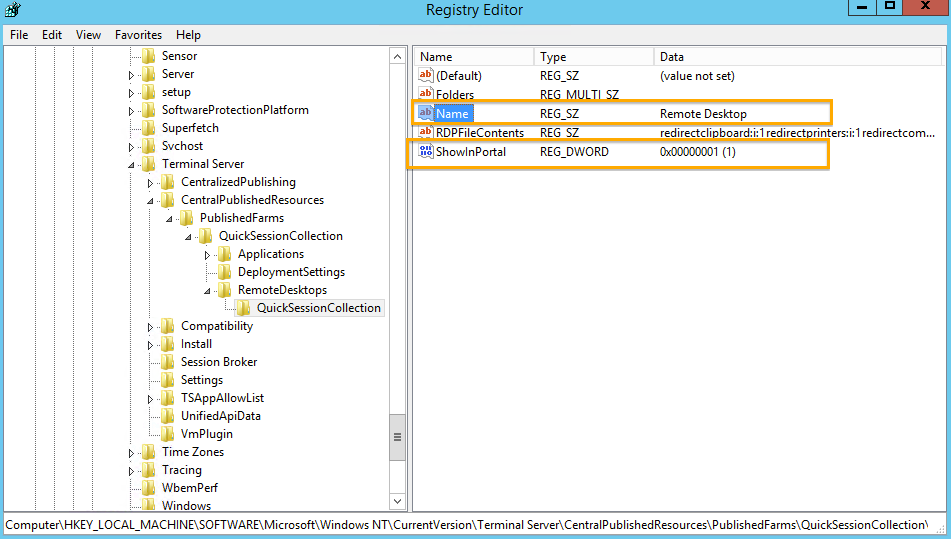
To show the Desktop Session Icon, Change the value (ShowInPortal) to 1 from 0.
You can also rename the Desktop Session Icon name to something more to your liking. To do this, change the value (Name).
Wednesday, 19 July 2017
Labtech agent keeps reinstalling?
How to remove Labtech agent.
Right-click PC or Company.
Scripts/Maintenance/Agent/Offboarding
Right-click PC or Company.
Scripts/Maintenance/Agent/Offboarding
Monday, 12 June 2017
Thursday, 4 May 2017
Giving all users Reviewer access to a mailbox calendar (works on resource calendars too)
Connect to Office365 Exchange online or open your local Exchange PowerShell.
Set-MailboxFolderPermission "MailboxName:\calendar" –User default –AccessRights reviewer
Set-MailboxFolderPermission "MailboxName:\calendar" –User default –AccessRights reviewer
Wednesday, 3 May 2017
Some Hyper-V guests loose network connectivity
Host has network, some guests have network and some do not.
It's a known problem with some network drivers and an update will resolve the issue, however you can also turn off a feature for a live running fix.
Set-NetAdapterVmq -Name "NIC 1" -Enabled $False
It's a known problem with some network drivers and an update will resolve the issue, however you can also turn off a feature for a live running fix.
Set-NetAdapterVmq -Name "NIC 1" -Enabled $False
Sunday, 30 April 2017
Raspberry Pi LCD Screen rotation
So you have your 7" Pi touch screen, but you have a case that mounts it upside down or need the connectors on the other side, what do you do?
Thankfully there is a very simple fix for this.
1, Edit the file /boot/config.txt
2, Insert the text 'lcd_rotate=2' at the top of the file.
3, Save and close then reboot.
This will also rotate the touch screen function to match the LCD panel.
Thankfully there is a very simple fix for this.
1, Edit the file /boot/config.txt
2, Insert the text 'lcd_rotate=2' at the top of the file.
3, Save and close then reboot.
This will also rotate the touch screen function to match the LCD panel.
Booting the Raspberry Pi from a USB hard disk or pen drive.
There are a number of Raspberry Pi SD card images which are pretty big, some as much as 128GB such as Hyperpie.
So do you spend £40 on a SD card which might end up being 1MB too small or do you use that old 256GB external USB drive you have in the cupboard. You use the HDD of course.
There are two ways to get the Pi to boot from a USB mass storage device, one is via a one-time setting which afaik cannot be changed back, I won't go near that.
The other option is so simple it's obviously the correct choice for most usages.
You will need an SD card to start the Pi and point it to the USB drive. This can be small, slow and old, it really does not make any difference.
So here's what I did (in Windows).
1, Use Etcher in Dangerous Mode to write your image to the external HDD in the same way you would to an SD card.
2, Mount the drive and copy all files from the Boot partition to the root of the SD card.
3, On the SD card, edit the file 'cmdline.txt'.
You will see a line with the text 'root=/dev/mmcblk0p2' replace this with 'root=/dev/sda2'
4, Plug in and enjoy.
Tuesday, 4 April 2017
Multiple VMs one public IP, port forwarding on Azure Resource Manager
If you want a single public IP with say port 80 going to VM1 and port 443 going to VM2 this is what you do.
The trick is to use an availability set. So when you create the servers they must all be added to the same Availability Set, yes I know you aren't doing load balancing, just add them. Don't add a Public IP on the VMs.
Now create a Load Balancer with a Public IP.
Now create an Inbound NAT rule, selecting the Availability Set will now prompt you for the target VM and NIC.
Each new Inbound NAT Rule can point to a different Network Interface within the Availability Set.
Monday, 13 March 2017
How to set your Public DNS name in Azure Resource Manager
The move to Resource Manager deployment in Azure is not so smooth.
This previously easy option is now very well hidden.
Forget everything Microsoft have poisoned your mind with for a second and remember how the internet actually works, they have finally followed reality.
The DNS names are now attached to the IP address, however, unlike all Microsoft products you do not set it under Properties, you set it under Configurations, confusingly there is also a Properties option.
TL:DR
1, Set a Public IP.
2, Select the IP Object.
3, Select Configuration.
4, Set the timeout and DNS name.
Wednesday, 22 February 2017
Add disk performance to Task Manager in Windows Server 2012 R2
On Windows 8 and 10 you can see your disks in the Task Manager Performance tab, I had always missed this feature on Server.
But... It seems it is there and just needs enabling, run the command below in CMD and restart Task Manager to see this very useful addition to your toolkit.
To enable disk performance counters.
To disable disk performance counters.
diskperf -n
But... It seems it is there and just needs enabling, run the command below in CMD and restart Task Manager to see this very useful addition to your toolkit.
To enable disk performance counters.
diskperf -y
To disable disk performance counters.
diskperf -n
Friday, 20 January 2017
Adding a reserved public IP on the classic Azure portal
#Connect to Azure
Add-AzureAccount
#Select Subscription
get-azuresubscription | out-gridview -passthru | select-azuresubscription
#Check for Reserved IP
Get-AzureReservedIP
#Reserve the current IP
New-AzureReservedIP –ReservedIPName MyReservedIP –Location "UK South" -ServiceName MyCloudService
#Check for Reserved IP
Get-AzureReservedIP
More details @ https://docs.microsoft.com/en-us/azure/virtual-network/virtual-networks-reserved-public-ip
Subscribe to:
Comments (Atom)